Here are our FAQ (Frequently Asked Questions) where our experts provide answers to questions commonly submitted to Backyard Organics. If you have a question that is not answered here, then please use our “Ask an Expert” page to get an answer for your question.
This question is asked a lot so let me make this as simple as possible. here is the formula;
Square feet of coverage area X inches of compost X .0031 = Yards of compost required.
for example, if you have a garden that is 10 ft. x 20 ft (200 sq ft) and you want to put 2 inches of compost in the garden, you would need; 200 x 2 x .0031 = 1.24 yards of compost.
for yards we typically spread 1/4″ and in gardens we will put 1/4 to 8 inches depending on the garden and soil needs. Hope that helps.
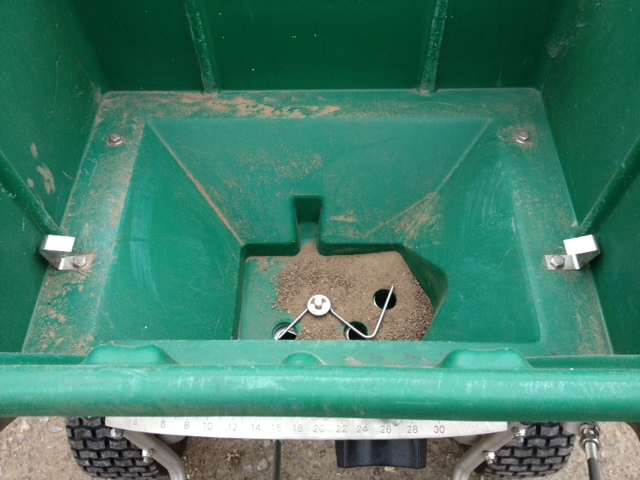
How can I calibrate my spreader? if your using our 10-0-4 fertilizer, which requires a minimum application rate of 7.5 lbs per 1000 sq. ft. we set our manual broadcast spreader (Lesco) to 27 and our ride on (Lesco) to 30, which is nearly wide open. if you tend to take a slower than average pace I would close the hole diameter a bit (refer to photo above).
How to calibrate a spreader
- Start with the opening at 75% open
- place just under 8 lbs (23 cups or 1 1/4 gallons) of fertilizer in hopper
- run the test on the yard so you are not wasting product. Our product will not burn your yard if over applied.
- Start applying until product has been used up then measure the area by taking the width times the length which equals your square footage.
- if the area measures around 1000 sq. ft your done. if the area measures around 500 sq ft you may need to apply more than one time (opposite direction is prefered). if you are slightly under 1000 sq ft. open the hole diameter and repeat. if you are over 1000 sq ft you should close the hole diameter and repeat.
First off, urea is a chemically produced form of nitrogen and synthetic fertilzers destroy healthy soils. Nitrogen is really the key nutrient for good plant growth and that is found in the first number listed on a bag of fertilizer but there only a few natural forms of nitrogen so pay attention to the description on the bag. Applying too much nitrogen is bad for our environment and water system and applying too little can do little good to your plants. Generally there are 3 levels of nitrogen use depending on your expectations. 0 – 1lb/1000 sq ft/year of nitrogen should be used in sensitive environments, 2 lbs/1000 sq ft/year with 10% to 15% weed growth and 3lbs/1000 sq ft/year for 5% weed threshold or high profile areas. Here is an easy formula to determine the appropriate amount to use. Please note that you should only apply 3/4lb of Nitrogen/1000 sq ft/application.
Example using 10-0-4 fertilzer
A. 10% N = .10 = 10 lbs of nitrogen in a 100 lbs bag
B. 10 lbs /2 = 5 lbs of nitrogen in a 50lb bag
C. 50lb bag/10lbs N = 10lbs of fertilizer to deliver 1 lb N/1000 sq ft
D. 10lbs fertilizer x .75 = 7.5 lbs fertilizer/1000 sq ft
E. if your yard is 8000 sq ft you will need to apply 7.5lbs x 8 = 60lbs of fertilzer to get 3/4lb N per 1000 sq ft.
Conventional land care professionals use some of the following herbicides in spring and fall:
Spring herbicides: Barricade or Dimension
Fall herbicides: Surge or Vessel
Timing is critical for the pre-emergent application due to the seed germinating process, however not so much with the remaining applications. Production farmers are using compost teas weekly so applying once a month will not harm your plant life and applying any amount of compost tea/extracts is better than applying no application.
We have a compost special made for us by an organic herb farm in Central IL, so it has lots of plant residues from many different herbs. We see this giving our compost tea a unique habitat for the microbes not only those that are native to the compost, but also the ones we specifically add to increase diversity.
By keeping manure out of it, we have not had any issues with pathogens, and our supplier routinely checks for E Coli, Coliform, and Salmonella. If they did find any in our QC checks, they would dump that batch and not sell it. Since this is the same product used with commercial produce and fruit growers, they don’t take any chances with those pathogens.
This is one of the things that sets our liquid application apart from home-brewed compost teas or any product utilizing manures, where the chance of containing these pathogens is much greater.
No. We use Corn Gluten Meal which has 60% protein making it much more affective as a pre-emergent while adding up to 10% Nitrogen. The cheaper corn gluten products are typically only 18% protein. Its the protein that is the catalyst to the pre-emergent affect and the nitrogen source.
Field bindweed (creeping Jenny) is very difficult to control because of its extensive root system. In turf situations, where cultivation is not practical, a post-emergent herbicide is recommended.
Small infestations of bindweed in non-turf areas sometimes may be controlled by covering the area with mulch and not allowing any green plant material to emerge. Field bindweed control is best achieved when plants are actively growing and in the seedling to flower stage of growth.
Multiple applications may be required for complete eradication. The reason for it not appearing to be as bad last year is probably linked to your persistence the previous year, which weakened the energy reserves of the plant’s root system.
I really think your best approach is to follow a combination approach of spraying anything that comes up with Roundup and covering the area with a black tarp for this growing season to hopefully starve the plant to death! Update!! 20 mule team borox (laundry soap) has shown some positive results against creeping Charlie
Here are some good tips regarding Turf Dormancy….
Responsible irrigation is the rule. This is a great time to assess the performance of irrigation systems, as the turf will quickly tell the story of any issues with coverage or output.
When circumstances permit, however, dormancy of well-established and otherwise healthy turf can lead to savings of time, labor and management resources if approached properly. If dormancy is allowable, remember these important points for managing dormant turf:
- If you opt for dormancy, commit to it. Avoid irrigation unless adequate and consistent evapotranspiration (ET) replacement can be achieved. Irregular and insufficient irrigation during dormancy can actually further deplete valuable carbohydrate reserves and negatively impact later recovery. If dormancy persists for an extended period (perhaps 45+ days depending on turf species, soil, etc), however, reduced recovery can be expected.
- Restrict traffic on dormant turf to the lowest possible level. The turfgrass shoots that die back when dormancy progresses are not able to adequately cushion and protect the critical meristems that will ultimately facilitate re-growth and recovery.
- Mow only when absolutely necessary. If a mowing event is needed, avoid mowing during the hottest part of the day (this benefits the turf as well as the operator). For full UMass article, visit: http://extension.umass.edu/turfmanagement-updates/dry-conditions-turf-dormancy
When applying our Early Fall application we add additional microorganism that are specifically built to break down dead plant material (thatch) into organic matter. Why? Check out the following results of a study done using the same microorganisms on farm fields.
A couple years ago a study was done that measured organic matter on several farms which have used microorganisms for a number of years, including a research farm near Princeton, IL. With permission from neighbors, we pulled samples from biologically farmed fields and adjoining conventionally farmed fields with the same soil types.
Our soil samples were segmented into (a) the top three inches, (b) three-to-six inches, and (c) six-to-12 inches. Soils were tested by Midwest Laboratories, and in every instance the organic matter was higher on the biologically farmed field than on the neighboring conventionally farmed field.
The first set of samples we pulled at our farm compared our biologically farmed soil with the conventionally managed soil to our south, and showed our soil had:
- 23% more organic matter in the top 3 inches
- 26% more organic matter in the 3-to-6 inch profile
- 10% more organic matter in the 6-to-12 inch profile
- The difference across a line where a fence once stood was amazing! Our side was dramatically higher in carbon content. So, we checked another side of the farm.
This time we compared our soils to the conventionally-farmed soils adjoining our west boundary. These tests showed we had:
- 40% more organic matter in the top 3 inches
- 49% more organic matter in the 3-to-6 inch profile
- 0% more organic matter in the 6-to-12 inch profile
- Even more dramatic! Averaging these two sites, the biologically farmed soil has 3.9% organic matter compared to 2.9% on soils without microorganisms added.
The difference is 1% organic matter.
- 1% organic matter = 20,000 pounds of organic matter per acre.
- 1% organic matter also translates into the soil’s ability to store another 10,000 gallons of water per acre. That’s about one-third of an inch of extra rainfall captured each time it rains. We usually run low on soil moisture three or four times between summer rains, and an extra third of an inch of stored moisture delays severe moisture stress by one-to-three days each time. Through the growing season, that could give a crop a moisture reserve of an extra four-to-12 days!
What is organic matter? Sure, it is largely carbon. But what else?
That extra 1% organic matter adds:
- 1,000 lbs. nitrogen/acre
- 650 lbs. phosphate/acre
- 115 lbs. potash/acre
- 700 lbs. calcium/acre
Building organic matter/sequestering carbon on your far, garden or turf is “true fertility” gained. The additional carbon has countless benefits for your soil. The sequestered nitrogen and other nutrients have countless benefits for your wallet.
The ribbon Test. Here is how. A quick and easy way to test soil structure is to try the ribbon test. Simply place a small soil sample in the palm of your hand and rub back and forth with 2 fingers. If the soil begins to break down prior to achieving ½ inch in length you likely have predominately sandy soils.
If the soil breaks down at 1 ½ inch you have a loam soil. If the soil breaks down at 1 ¾ inch or longer you have a clay soil. Knowing this information will help you better understand the current capabilities of your soil and what is required to achieve a healthier soil, however by itself, soil structure is only a part of the big picture in achieving our goal.